So, you’re thinking about building a DIY garden room? Brilliant! But before we get carried away with choosing the perfect paint colour or interior design, let’s talk about the foundation first. This guide is all about showing you how to create a solid, reliable base using screw piles, a smart and easy solution for that perfect outdoor retreat.
Why Choose Screw Piles as Your DIY Garden Room Foundation?
Traditional concrete foundations can be a real hassle. There is mess, lengthy drying times, and potential damage to your garden, all of which cause a headache. Screw piles, on the other hand, offer a refreshing alternative.
Screw piles are essentially large, heavy duty screws that are driven into the ground, providing a stable and level base for your structure. This method is faster, cleaner, and often more cost-effective than traditional concrete foundations, especially if you like to get your hands dirty and have experience with construction. Forget the backbreaking work of digging and pouring concrete, this is the way forward if you want to save some time.
There are a few benefits of using screw piles. They minimise ground disturbance, perfect for keeping your garden looking its best. Plus, you can often start building immediately after installation, meaning you will get to enjoy that cuppa in your new DIY garden room much sooner.
A Step-by-Step Guide to Installing Your Screw Pile Foundation
Right, let’s get down to business. This section provides a clear, comprehensive guide to getting those screw piles in the ground and ready for your DIY garden room. Remember, while this is a DIY guide, safety is paramount.
Step 1: Planning and Preparation
Before you even think about touching a screw pile, you need a plan. Start by marking out the exact area where your garden room will sit. Consider the size of your structure and the load it will bear, as get a project calculation which will determine the number and size of screw piles you need. It might be useful to refer to a professional for guidance on local building regulations and requirements. One place where you can get a garden room foundation calculation FREE OF CHARGE is groundplug.co.uk. The skilled engineers behind this company will take into account the slightest details to deliver a precise plan for your specific garden room. Not only do you receive the number and size of foundations needed, you will also receive a sketch with proper placements of the screw piles.
Once you’ve got your plan, clear the area of any obstructions, such as plants, rocks, or debris. Accurate measurement is crucial at this stage. A wonky foundation will lead to a wonky garden room, and nobody wants that. Ensure the site is level, and if it is not, you should use the screw piles to ensure the area is fully supported, ensuring that your DIY garden room does not tilt.
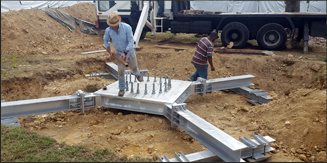
Step 2: Marking and Positioning
With your area prepped, it’s time to mark the precise locations for each screw pile. This needs to be accurate to the millimetre, so double, even triple, check your measurements. Spacing is key here. Too far apart, and you risk compromising the stability of the foundation, too close, and you’re wasting materials and effort.
Use wooden stakes or marker spray to clearly indicate where each pile will go. It might sound simple, but a bit of patience at this stage will save you a lot of bother later on. Taking your time during this phase really pays off, because starting off correctly avoids costly mistakes.
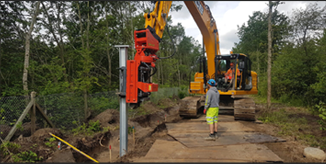
Step 3: Installing the Screw Piles
Now for the main event, getting those piles in the ground. You’ll likely need a driving tool for this, whether it is a handheld or ground machine. The exact type will depend on the size of your piles and the soil conditions. Often you are able to hire this equipment from the screw pile provider.
Begin by placing the first screw pile at one of your marked locations. Ensure it’s perfectly vertical. Use a spirit level to double check. Start driving the pile into the ground, applying steady, even pressure.
Step 4: Driving and Levelling
As you drive the pile deeper, continue to monitor its level. You may need to make slight adjustments as you go. Keep a close eye on the surrounding ground, watching for any signs of excessive movement or instability.
If you encounter any significant resistance, stop and investigate. It could be a large rock or other obstruction. Trying to force the pile could damage it or throw your entire layout off. Make sure to assess and remove any obstructions that get in the way.
Step 5: Checking and Final Adjustments
Once all the piles are in, it’s time for a final check. Use a long spirit level or a laser level to ensure all the piles are perfectly aligned. Even small discrepancies can cause problems later on.
If any adjustments are needed, you can usually make them by carefully turning the pile slightly. Remember, precision is the name of the game. Your garden room’s stability depends on it. This stage is vital for long term use of the garden room.
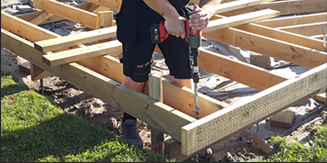
Step 6: Connecting the Frame
With your screw piles firmly in place and level, you can begin constructing the frame that will support your DIY garden room. This is usually made of timber. Follow the manufacturer’s instructions for your specific garden room design.
Ensure the frame is securely attached to the screw piles. This connection is what transfers the load from the structure to the foundation. The fixings need to be nice and strong.
Safety Precautions
DIY projects can be fun, but they always come with risks. When working with screw piles and machinery, safety is paramount. Always wear appropriate safety gear, including gloves, safety glasses, and sturdy footwear.
If you’re unsure about any part of the process, don’t hesitate to seek professional advice. It’s better to be safe than sorry. Before you start, make sure you’re comfortable with the tools and the process.
Making Your Project Easy
Building a DIY garden room can significantly enhance your outdoor living space. With screw pile foundations, you get a solution that’s both efficient and straightforward. This is the perfect solution for any homeowner.
Here at GroundPlug® UK Screw Pile Foundations, we provide innovative, no dig, no concrete screw pile foundation systems that make these kinds of projects a breeze. We offer a system that saves you the hassle of traditional methods and is great for the environment, which makes our systems an ideal choice for homeowners looking to create a sturdy, long lasting base for their garden rooms. Our solutions are great for a variety of structures, and our team is here to provide the support and guidance you need, so why wait, get in touch today.
We also pride ourselves on years of experience in the rail and road industries, where we provide reliable solutions for large industrial structures, such as bridges, masts, and noise barriers. Have a look at our industrial solutions.


.svg")


